Minecraft Cone Generator
Build perfect 3D voxel cones, spires, and pyramids. Toggle hollow or inverted modes, then export directly to command blocks.
By Sharjeel, Developer & Maintainer of Ghostern Tools. Updated September 2026.
Minecraft Cone Generator is a browser-based planning tool for spires, roof cones, pyramids, and inverted funnel shapes on Minecraft’s block grid. Set the base radius and height, choose a shape mode, preview the result in 3D, inspect each layer in a 2D blueprint, and export the build as commands, a datapack file, or JSON block data.
What Is a Minecraft Cone?
A cone in Minecraft is a stack of horizontal rings that shrink in radius as they rise, converging toward a single point (or a small cap) at the top. Because the game only has discrete blocks to work with, that convergence happens in visible steps rather than a smooth taper — each layer up, the ring gets a little narrower until only one or a handful of blocks remain at the apex.
That stepping pattern is exactly what’s hardest to get right by hand: shrink each ring too fast and the cone looks jagged and lopsided; shrink it too slowly and the sides bulge instead of tapering. The generator calculates the correct radius for every single layer from your base radius and height, so the taper comes out consistent without you tracking the math yourself.
What This Cone Generator Does
- Base Radius & Height controls — set the width of the bottom ring and how many layers tall the cone rises.
- Inverted mode — flips the shape so the point sits at the bottom and it widens going up, for hanging or megaphone-style structures.
- Square Base mode — swaps the circular taper for a square one, turning the same tool into a pyramid generator.
- Hollow Shell toggle — generates an empty-interior shell instead of a fully filled cone.
- 3D preview with Slice Mode — orbit the full model, or step through it one Y-level at a time.
- 2D layer blueprint — shows the exact block layout for whichever layer you’re currently viewing.
- Exports — copy the current layer’s commands, copy the full set of build commands, download a
.mcfunctionfile, or export the raw block data as JSON.
How to Use the Cone Generator
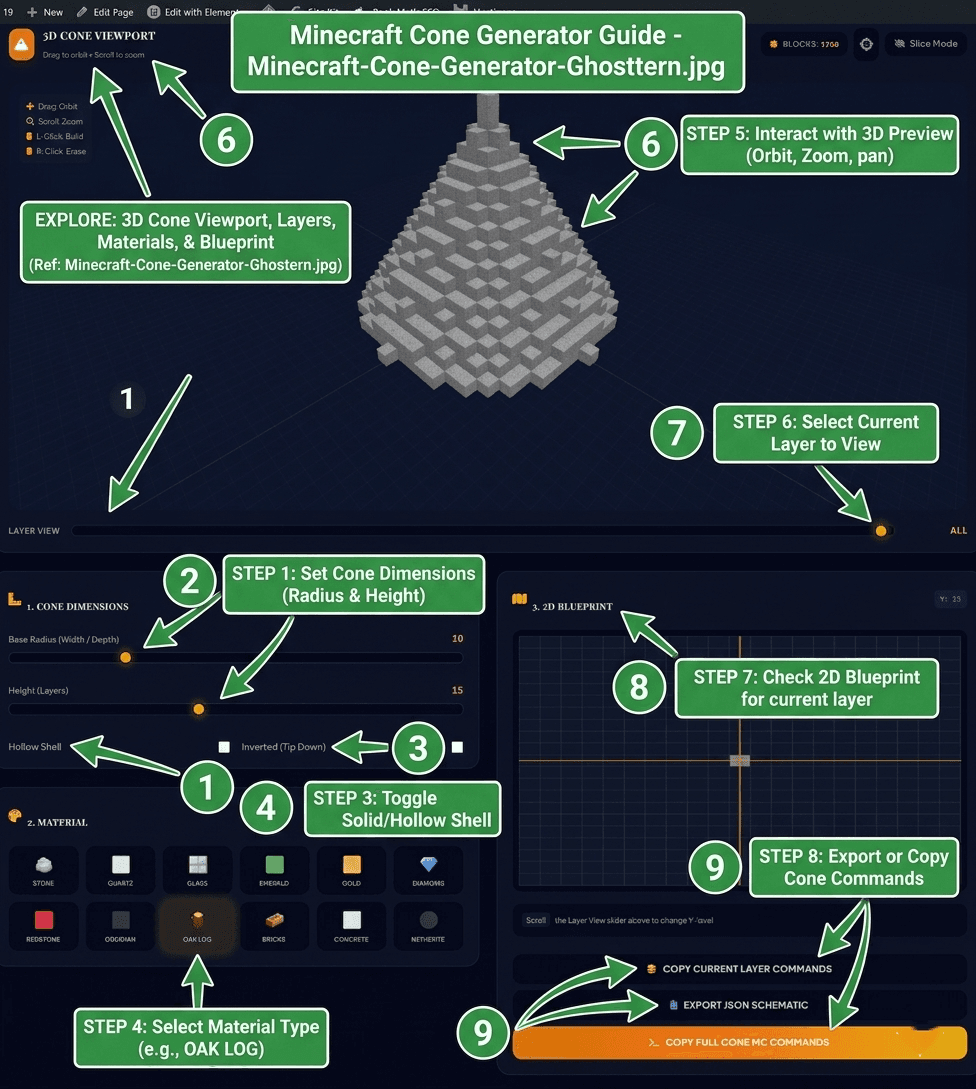
- Set the base radius. This controls how wide the cone is at the bottom ring.
- Set the height. This is how many layers the cone rises before it converges to a point.
- Choose a shape mode. Leave both toggles off for a standard cone, enable Inverted to flip it point-down, or enable Square Base for a pyramid instead of a circular taper.
- Toggle Hollow Shell if you want an empty interior — useful for anything you don’t need to fill solid.
- Pick a block. The 3D preview updates immediately with your chosen material.
- Inspect the shape. Orbit and zoom the 3D viewport, then switch to Slice Mode and use Layer View to step through individual Y-levels.
- Read the 2D blueprint for the currently selected layer — it shows exactly which blocks belong on that ring.
- Export. Copy the current layer’s commands for manual building, copy the full command set, download a
.mcfunctionfile for a datapack, or export the block data as JSON.
Choosing a Base Radius and Height
There’s no universal correct ratio, but a few starting points make the shape come out looking intentional rather than accidental:
| Goal | Rough starting point |
|---|---|
| Small decorative spire | Radius 5–7, height roughly equal to radius |
| Classic roof cone | Radius 8–10, height about 1.5× the radius |
| Tall dramatic spire | Same radius, height 2× or more |
| Grand structure | Radius 15+, scale height to match the surrounding build |
A height noticeably shorter than the radius produces a squat, flattened cone; a height much taller than the radius produces a thin needle-like spire. Check the 3D preview before committing — it’s faster than adjusting the shape after you’ve already started placing blocks.
Standard, Inverted, and Square Base (Pyramid) Modes
- 🔺 Standard: wide at the base, narrowing to a point at the top — the shape for tower roofs, spires, and volcano peaks.
- 🔻 Inverted: point at the bottom, widening going up — for hanging fixtures, funnel shapes, or megaphone-style architectural details.
- 🛑 Square Base: the same height and taper logic, but built on a square footprint instead of a circular one, producing a four-sided pyramid.
Hollow vs. Solid Cones
A hollow cone generates only the outer shell, leaving the interior empty — the practical choice for roofs, since a filled cone that size is mostly wasted material sitting inside a shape nobody will ever see into. A solid cone is worth using when the cone itself is the point of the build — a decorative mound, a filled pyramid core, or terrain shaping where the interior needs to actually contain blocks.
Material Choices
- Quartz or white concrete — clean, modern spires and sci-fi structures.
- Stone or cobblestone — traditional tower roofs and fortress builds.
- Obsidian, blackstone, or netherite — dark, imposing spires, or Nether-themed structures.
- Gold, emerald, or diamond — fantasy and RPG builds where the cone itself is meant to stand out.
- Glass — greenhouse-style caps or light-transmitting structural accents.
Popular Uses for Cones and Pyramids
More Minecraft Tools from Ghostern
Frequently Asked Questions
❓ How do I make a hollow cone in Minecraft?
Enable the “Hollow Shell” toggle. The generator recalculates the shape as an outer shell only, leaving the interior empty.
❓ Does this work for both Java and Bedrock Edition?
Yes. The exported /setblock commands are standard Minecraft syntax and work in both editions. Java players can also download a ready-to-use .mcfunction file for datapacks.
❓ What’s the difference between a cone and a pyramid in this tool?
Both use the same radius-and-height taper logic. A standard cone applies it to a circular base; enabling “Square Base” applies the same taper to a square footprint instead, producing a four-sided pyramid.
❓ What radius and height should I use for a roof cone?
Radius 8–10 with height around 12–15 is a reasonable starting point for a classic roof cone. Smaller radii (5–7) suit decorative spires; larger radii (15+) suit grand structures. Check the 3D preview before finalizing — the right size depends on the building it’s sitting on top of.
❓ What does Inverted mode do?
It flips the taper direction so the point sits at the bottom and the shape widens going up — useful for hanging fixtures, funnels, or unusual roof silhouettes rather than a standard tower cap.
❓ How does the 2D blueprint help me build by hand?
It shows the exact block layout for whichever Y-level you’re viewing, so you can build layer by layer in survival mode without commands — place the ring shown, move up one layer, repeat.
📅 Last updated: September 2026 | Tool by Ghostern — independent creator, not affiliated with Mojang or Microsoft.