3D Cone Viewport
Drag to orbit • Scroll to zoom
1. Cone Dimensions
2. Material
3. 2D Blueprint
Building a perfect cone or spire in Minecraft is surprisingly difficult. Getting the slope right, maintaining symmetry, and making sure the tip aligns perfectly often leads to hours of trial and error. The MC Cone Generator Pro solves that problem instantly. It is a free, browser-based tool that generates a voxel cone (or inverted cone) with real-time 3D preview, a synchronized 2D blueprint, and full export options – so you can plan, preview, and build without wasting a single block.
Whether you need a pointed tower roof, a volcano peak, a wizard spire, or an inverted cone for a megaphone-like structure, this tool gives you complete control over base radius, height, hollow shell mode, and inverted orientation. The 3D viewport lets you orbit and inspect your cone from any angle, while the 2D blueprint shows each layer so you can build it block by block.
How to Use the Minecraft Cone Generator
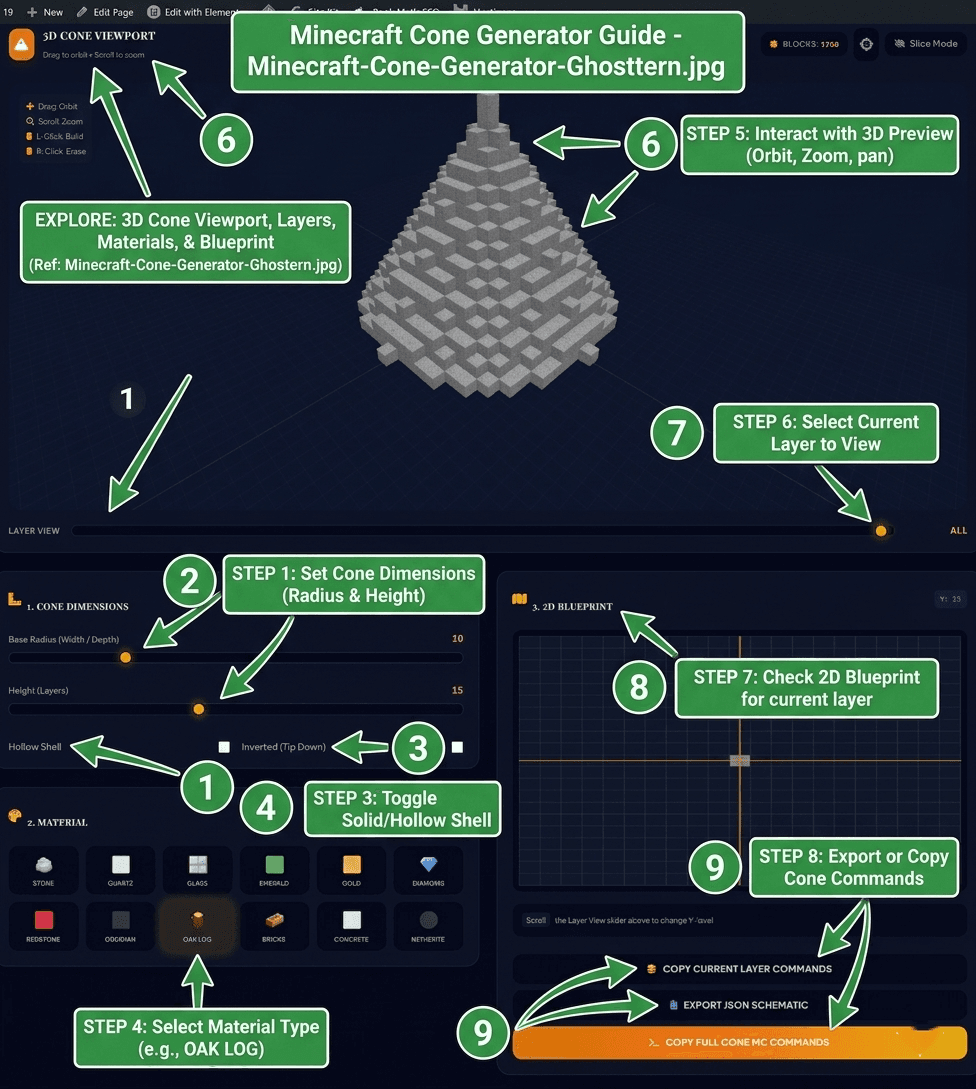
Using the cone generator is simple. Here is exactly how to go from idea to build plan:
- Set the cone dimensions. Adjust the Base Radius slider to control the width of the cone’s bottom. Then adjust the Height slider to determine how tall your cone will be. Higher values create taller, more dramatic spires.
- Choose your shape mode. Use Normal mode for a standard cone that starts wide at the bottom and narrows to a point at the top. Enable Inverted mode to flip the cone – the tip points downward, creating a hanging cone shape.
- Toggle hollow mode. Enable Hollow Shell for an empty interior – this saves blocks and makes the cone lighter. Disable it for a solid cone that you can use as a structural fill.
- Pick your material. Choose from the material palette – options include Stone, Quartz, Glass, Emerald, Gold, Diamond, Redstone, Obsidian, Oak Log, Bricks, Concrete, and Netherite. The cone instantly updates with your chosen block.
- Preview in 3D. Use your mouse or touch to drag and orbit the camera around your cone. Scroll to zoom in and inspect the detail. Use the Layer View slider to see individual horizontal layers.
- Check the 2D blueprint. The blueprint canvas updates in real time – it shows the exact block arrangement for the selected layer. This is your build plan for placing blocks in-game.
- Export your build. Copy full cone commands to paste into a command block, copy single layer commands for manual building, or export a JSON schematic for reference or sharing.
Why Use This Minecraft Cone Generator?
Building a cone manually is one of the hardest shapes to get right in Minecraft. The block count, the stepping pattern, and the symmetry all demand precision. Here is why this tool makes cone building effortless:
- It eliminates guesswork. The tool calculates every block position based on the radius and height you choose – no manual math required.
- It shows you the shape instantly. The 3D viewport lets you orbit and inspect your cone before you place a single block. You can see exactly what you are building.
- It provides a build plan. The 2D blueprint shows you exactly where to place blocks for each layer – just follow it and your cone will be perfect.
- It saves time. Instead of spending hours counting and placing blocks, you can generate the cone, copy the commands, and build it in seconds.
- It supports both normal and inverted cones. Whether you need a standard spire pointing up or an inverted cone for a hanging roof, the tool handles both.
- It works for any build style. Choose from 12 different materials to match your aesthetic – from quartz towers to netherite fortresses.
Best Use Cases for Minecraft Cones and Spires
Cones are versatile and visually striking structures. Here are some of the most popular ways players use them:
- 🏰 Tower Roofs & Spires – Use a stone or quartz cone as the pointed roof for a castle tower or a wizard’s spire. The tapered shape gives a dramatic, medieval feel.
- 🌋 Volcano Peaks – Build a cone-shaped volcano with an open top. Use obsidian or stone for a dark, menacing look.
- 🏛️ Fantasy & RPG Builds – Gold, emerald, or diamond cones add a majestic, magical feel to any fantasy world or roleplay server.
- 🛸 Futuristic & Sci-Fi Structures – Use quartz or concrete cones for a clean, modern, sci-fi aesthetic – perfect for space stations or futuristic bases.
- 🎮 Survival Mode Bases – A cone roof is visually striking and provides excellent protection from mobs and weather.
- 🧙 Wizard Towers – A pointed cone roof is the signature look for any wizard tower. Use dark materials for a mysterious, magical feel.
- 🏗️ Megaphone or Inverted Roofs – Inverted cones are perfect for hanging roof designs, megaphone-like structures, or unique architectural features.
- 📷 YouTube Thumbnails & Stream Overlays – Use the 3D viewport to capture the perfect angle of your cone for thumbnails or stream graphics.
Cone vs Inverted Cone – What Is the Difference?
Understanding the difference between these two modes will help you choose the right shape for your build:
- 🔺 Standard Cone – The base is wide at the bottom and narrows to a point at the top. This is the most common cone shape – perfect for tower roofs, spires, and volcano peaks.
- 🔻 Inverted Cone – The tip is at the bottom and the shape widens as it goes up. This creates a hanging cone or megaphone-like shape – ideal for unique roof designs, hanging structures, or architectural accents.
The tool lets you switch between these two modes instantly with a single checkbox. When you enable Inverted, the cone flips vertically – the base becomes the top, and the tip points downward.
Tips for Designing and Building Cones
Here are some practical tips to help you get the most out of your cone designs:
- Start with a smaller radius. If you are new to cone building, start with a radius of 8–10 and a height of 12–15. This gives you a manageable size that is still impressive. Larger radii (15+) are for grand builds.
- Use hollow shell for efficiency. If you are building a large cone, enable Hollow Shell – this saves blocks and makes the structure lighter without affecting the visual shape.
- Choose materials that match your biome. In snowy areas, use quartz or white concrete. In the Nether, use netherite or obsidian for a darker, more imposing aesthetic.
- Plan your entrance before building. If you are using the cone as a roof, plan where the entrance will be before you start placing blocks.
- Use the 2D blueprint for manual building. If you prefer building block by block, the blueprint shows exactly where each block goes for every layer.
- Experiment with inverted cones for variety. If a standard cone feels too predictable, try an inverted cone – it adds a unique, eye-catching element to your builds.
- Match height to radius for a classic cone. For a balanced cone, set the height to about 1.5 times the radius. For a taller, more dramatic spire, increase the height further.
More Minecraft Tools from Ghostern
Frequently Asked Questions – Minecraft Cone Generator
❓ What does the Minecraft cone generator do?
It generates a voxel cone (or inverted cone) based on the radius, height, and material you choose. You can preview it in 3D, view the 2D blueprint, and copy or export build commands for use in Minecraft.
❓ How do I make a cone in Minecraft?
Use this tool to generate the cone, then copy the commands or follow the 2D blueprint. For manual building, the blueprint shows each layer – just place blocks following the pattern. If you prefer a step-by-step guide, the 2D blueprint is your best friend.
❓ Can I make a hollow cone?
Yes. Enable the Hollow Shell toggle – the generator will only place the outer layer of blocks, leaving the interior empty. This is great for saving blocks and making lightweight structures.
❓ What radius should I use?
A radius of 8–10 with a height of 12–15 is a good starting point for a classic cone. Larger radii (15+) are great for grand builds, while smaller radii (5–7) work well for decorative elements like small spires.
❓ What is inverted mode?
Inverted mode flips the cone so the tip points downward. This creates a hanging cone or megaphone-like shape – perfect for unique roof designs, hanging structures, or architectural accents.
❓ How does the 2D blueprint help?
The blueprint shows the block arrangement for any selected layer. It is a bird’s-eye view that tells you exactly where to place blocks, making manual building straightforward – especially useful when you want to build a cone roof in Minecraft without using commands.
❓ Does the tool work on mobile?
Yes. The interface is fully responsive. The 3D viewport supports touch controls – you can orbit, zoom, and inspect the cone on phones and tablets.
❓ What is the difference between a cone and a spire?
A cone is a general shape that tapers from a base to a point. A spire is a specific type of cone – typically tall and narrow – used as a tower roof or decorative element. This tool can generate both.
❓ Can I use this for roof planning?
Yes. Cones are an excellent choice for roof designs, especially for towers, castles, and fantasy builds. Use the tool to preview the shape before building – perfect for when you need to figure out how to make a cone roof in Minecraft.
❓ What materials are available?
Twelve materials: Stone, Quartz, Glass, Emerald, Gold, Diamond, Redstone, Obsidian, Oak Log, Bricks, Concrete, and Netherite. Each material gives your cone a unique look and feel.
🏔️ Generate Your Minecraft Cone Now
Choose standard or inverted mode, adjust the radius and height, pick your material, preview in 3D, and export your build plan – all in one place.
📅 Last updated: June 2026 | Tool by Ghostern – independent creator, not affiliated with Mojang or Microsoft.